
With summer finally here, we wanted to share some ideas with you that are cost effective and will make your garden seem like a peaceful haven with just the right touch of rustic-ness. That's why we have created a helpful guide on different ways to use sleepers to make your garden seem extra special. Here at Stone Zone, we stock, Pine Sleepers and Oak Sleepers ideal for any type of garden.
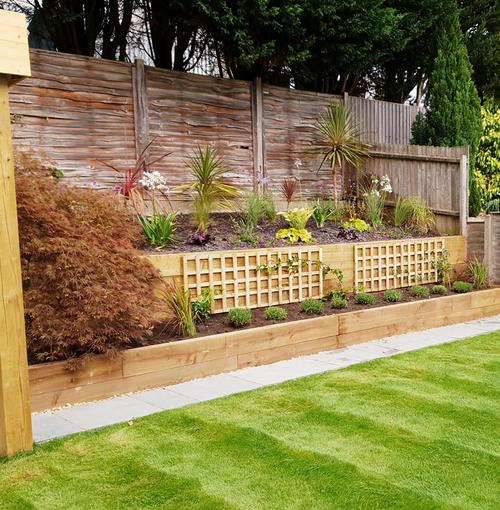
1. Raised sleeper beds
A popular yet in no way less effective is to use sleeper is to create raised beds for your flowers! There are many benefits of plating your flowers within a raised bed as they improve drainage, enhance root health, will enable you to match the soil depending on the plant, and are, overall, much easier to manage when compared to plant pots.
1) Choose the right timber sleepers for your raised garden bed. At Stone Zone we have a variety of sleepers that will stand the test of time and provide you will strong and reliable raised beds that will not deteriorate.
2) Once you have decided what type of sleepers you want to go with, take a good look at your garden and decide on where you want to place the raised beds and how big you want them. Make sure to not crowd your garden as that will only detract from your garden’s aesthetics.
3) Now that you have figured out where you want your raised beds to be placed it’s time to fasten them in place in a rectangular shape. Many of our customers have commonly installed the sleepers directly onto the ground, be it on the soil, grass or concrete, however it is often recommended by landscapers to install them on a base foundation of concrete or hardcore. Once you are ready to secure the sleepers in, use two 150mm timber screws at each corner to attach the sleepers together. While you’re doing this, make sure that 50mm of the length of the screw needs to drill into the adjoining sleeper to create a solid connection
4) Once you are confident that your first layer is secure, proceed to add a second layer of sleepers to make your bed go deeper into the ground. Keep in mind, that you are welcome to stop at just the initial layer, however, it is common practice to have 2 layers. When adding this second later, we advise that you lay the sleepers individually on the box you have already created, overlapping them as if you were laying bricks. Start at a corner and screw them together before adding the rest of the sleepers, this is the easiest way to achieve the same rectangle shape. Then start attaching the layers with timber screws, drilling top-down to secure the layers together. Repeat this process depending on how many layers you want.
5) We highly recommend that you also install a plastic weed membrane inside of your raised bed to create a barrier between the wet soil and the wooden sleepers. At Stone Zone, we stock a Weed Check Fabric in a wide variety of sizes so you are covered no matter how big your raised beds are. These Weed Check Fabrics are extra important if you want to install your raised beds directly on the ground as that will prevent weed growth.
6) Your raised beds are now ready to be filled! But make sure not to start by filling it with soil. Before that, the first step is to put in some cobbles or hardcore to improve drainage. Now it is safe for you to put your soil in. At Stone Zone, we have a wide variety of high-quality soil ranging from ones that are appropriate for fruit and veg and ones that are best for plants! Our Wessex Soil range will cater to all your soil needs. And finally, to really give your plants a boost and their best chance, apply a top layer of bark mulch or slate chippings
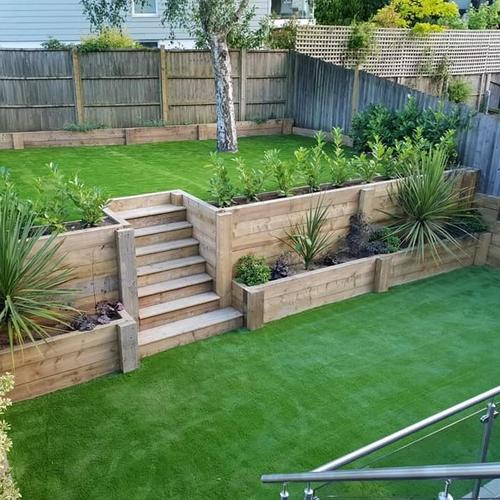
2. Sleeper steps
A unique and affordable way of creating steps in your back garden is to use sleepers. They are not complicated to create and will give your garden a rustic and cottage-like feel.
Rather than using more traditional materials like paving, sleeper steps will have a unique focal point for your garden.
1) Cut your sleepers to whatever size you want your steps to be.
2) Using your sleepers, mark out where you want your steps to go and dig out the area to prepare the area for the sleepers to be fixed.
3) The best way to fix your sleepers is solely based on the ground you are placing them on. If the ground is soft or uneven, we think the best option would be to concrete them into place. If the ground is firm, a wooden stake driven into each sleeper and attached to the sleep should hold them securely in place. Make sure to dig for the sleepers and the stakes when digging the shapes.
4) If you are using the stake option: Place your sleeper and then drive two wooden stakes into the ground directly behind the sleeper at either end. Use a spirit level to ensure the sleeper is level before attaching, then screw the stake into the sleeper.
5) If you are using concrete: lay a bed of concrete between 50mm – 100mm thick, with a little extra at the front and behind the sleeper. Arrange the sleeper upon the concrete bed and add concrete in the area behind it. Then use a spirit level to make sure the sleeper is level.
6) Now, if you are installing them on a slope for a tiered/stairs effect then just follow the steps above starting by shaping the slope for the treads and risers by removing soil or adding more if the slope is irregular. Measure the height and length between the slope levels to calculate a suitable dimension for treads and risers. Before you install any sleepers where you want them, mark out where the area where the front edge of each step will go to make sure the gap between them is even. Now you can start fixing your sleepers in place using the methods above.

Sleeper As A Feature
Wooden Sleepers are a great way to create a feature area in your front or back garden without it being a hige hassle. It actually makes for a great summer DIY Project if that is something you are interested in. These sleepers give off a vintage and homely vibe that will impress all your friends and family.
1) Analyse your garden and decide where and how long you want your feature area to be. Once you have figured that out, use a tape measure to measure out the length of the wall.
2) Use string lines and pegs to mark out the desired area, if you want a curved line, you will most likely need more pegs.
3) Now work out how many sleepers you’ll need to cover the length of your wall. You can easily work this out by measuring the width of the sleeper and dividing the wall length by that measurement.
4) Now you can proceed to cut the sleepers to your desired length.
5) Using your string line from earlier, use a shovel and dig a trench. Dig the trench 500mm longer than your longest sleeper length.
6)Once you have successfully dug out your trench pour in enough scalpings to fill up to the depth of 500mm. Then use a shovel to smooth out the surface and make it even.
7) Now you can place the sleepers vertically and position them side by side. If your wall is curved, make to sure angle the sleepers until you have the desired curvature.
8) Once you are satisfied with the sleepers’ positions, pour in a dry cement mix. Then use a hose or a bucket of water to add water to the cement in the trench. Make sure to follow the manufacturer’s instructions when completing this step.
9) And once the cement is dry, your walls should be reinforced and strengthened.
10) Finally, to encourage water to drain away from the wall, fill the wall with shingle and scalpings.

Sleeper pond
Nothing is nicer and more tranquil than a little pond in your garden. It will create a beautiful ecosystem within your garden and an impressive centrepiece. Although there are many ways to create ponds in a garden, we think using sleepers is an excellent option for creating a pond as it will give off a more natural and picturesque feel. If you want to take on the project of creating your own sleeper pond, we have written up a helpful guide to getting you on your way.
1) Lay the sleepers on the ground and fasten them together. To begin constructing your raised pond, lay your sleepers in a rectangular shape, with the narrowest sides on the ground and facing upwards. Use the spirit level again to check that the sleepers aren’t wonky. Once you have done this, use two 150mm timber screws at each corner to attach the sleepers together. 50mm of the length of the screw needs to drill into the adjoining sleeper to create a secure connection.
2) Add another layer to the raised pond. Once you have secured the initial first layer, it is time to add a second layer. To create the second layer the best practice is to lay each of the sleepers once by one on top of the box you have created, make sure to overlap the joins as if you are bricklaying. Create one corner and screw these together before adding the remaining sleepers to create the same rectangular shape. Next, attach the layers together using 150mm timber screws, drilling and securing the two layers together, make sure to drill from the top for maximum security. Keep adding sleeper layers depending on how deep you want your pond.
3) Attach a pond liner to the sleepers. To ensure water won’t leak out and to hold the water securely, attach and fix a pond liner to the sleepers. If there is an excess line folded over the top of the pond, you can fix additional sleepers on top to hide the line from sight.

Sleeper Fences
Last but not least, sleepers are ideal for creating borders and edges to add more structure to your garden. Although sleepers are definitely not the only way to add fences to your garden, they are great if you want to create a rustic, homespun look within your garden then this idea is for you.
1) Analyse your garden and decide where and how long you want your sleeper fence to be. Once you have figured that out, use a tape measure to measure out the length of the wall.
2) Use string lines and pegs to mark out the desired area, if you want a curved line, you will most likely need more pegs.
3) Now work out how many sleepers you’ll need to cover the length of your wall. You can easily work this out by measuring the width of the sleeper and dividing the wall length by that measurement.
4) Now you can proceed to cut the sleepers to your desired length.
5) Using your string line from earlier, use a shovel and dig a trench. Dig the trench 500mm longer than your longest sleeper length.
6) Once you have successfully dug out your trench pour in enough scalpings to fill up to the depth of 500mm. Then use a shovel to smooth out the surface and make it even.
7) Now you can place the sleepers vertically and position them side by side. If your wall is curved, make to sure angle the sleepers until you have the desired curvature.
8) Once you are satisfied with the sleepers’ positions, pour in a dry cement mix. Then use a hose or a bucket of water to add water to the cement in the trench. Make sure to follow the manufacturer’s instructions when completing this step.
9) And once the cement is dry, your walls should be reinforced and strengthened.
10) Finally, to encourage water to drain away from the wall, fill the wall with shingle and scalpings.